Instruction
manual of program ASTRO-QUICKCAM
Synopsis
1. Warnings, Conditions of use. Exemption of responsibilities
*
2. General presentation *
2.1. The state of the functions at the
time of publication *
3. Functions for astronomy *
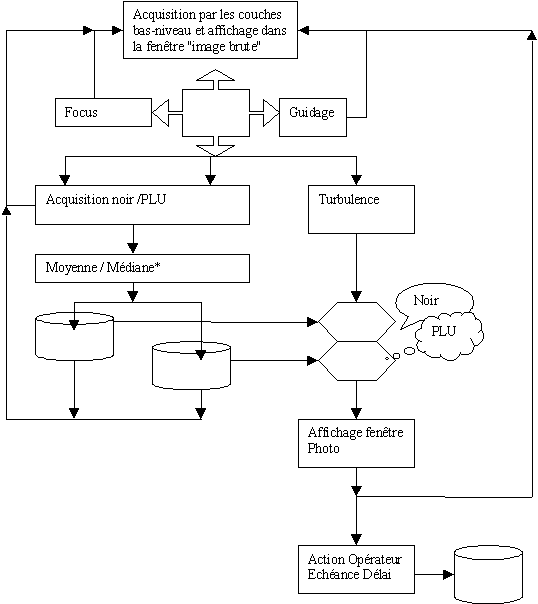
3.1. The image capture *
3.2. The pretreatment on line *
3.3. The measurement of turbulence *
3.4. Guidance *
3.5. The
*
4. Program instructions *
4.1. The
*
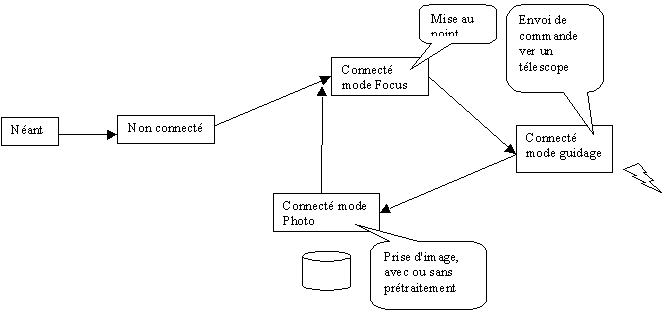
4.2. 4 basic states *
4.3. The parameter setting of the options *
4.4. The parameter setting of the timing *
5. Detailed use and better parameter settings *
5.1. Black and FLAT taken the flight *
5.2. Black and FLAT by defect *
5.3. The need for follow-up *
5.4. Planetary images *
5.5. The of the deep sky
*
5.6. The post image processing *
6. Appendices *
6.1. How to have several cameras? *
6.2. Which Mode for Parallel connection " ECP, EPP...
" *
6.3. A3 *
Warnings, Conditions
of utilisation. Exemption of responsibilities
This version of test is provided as is and
without any guarantee.
" Although I think of having taken all the reasonable
precautions not to disturb your system, of the abnormal operations can
always arrive. It only rests on you to take all the precautions of use
if your computer contains significant data: back up, search for virus,
checking of the files installed and possible desinstallation. To in no
case, my responsibility could not be engaged by a damage with your data
which could only result from an imprudent behavior of your share. "
You take part in this test in a voluntary way in order
to improve, by your experience feedback, a tool which will be useful to
a community of impassioned: YOU MUST:
-
To make share of your problems in a way detailed by mall,
Mall:
jpgodard@cybercable.fr
-
To announce your wish of improvement,
-
To respect the intellectual rights of the author.
The functionalities noted by (*) are not yet available.
Example of useful information in a Mail:
-
Your email, to answer you or to join a discussion.
-
The type camera (N&B, colors, VC), the mark....
-
The version of the program which you use: there are several
of them. The number is in the screen " about".
-
Configuration (Version of Windows, size memory, size disc)
-
Your parameter settings at the time of the problem
-
What you want to do
General presentation
Program ASTROQUICKCAM was developed to facilitate the
use of the digital cameras in the field of amateur astronomy .
These cameras are cheap, easy to modify and implement,
and make it possible to obtain satisfactory results.
The following figure presents program ASTROQC.EXE to starting.

It is presented here in a Windows 95 environment
but also functions in the Windows 98 environment and under WINDOWS 3.1.
Software is 16bits (Visual BASIC 3.0) with a propriatory
memory manager.
This handbook will present:
-
functions interesting to amateur astronomy
-
program instructions
-
recommendations for use
The state of the functions
at the time of publication
-
I tested it with a quickcam B&W, color and Quickcam VC.
I am interested by the results of tests with the other cameras.
-
Attention, the program does not always treat a " compressed
" flow
-
The composition at output seems acceptable... use of FLAT
seems to work (It remains to define one FLAT residing on disc). The processing
of the blacks must still be worked on..(I am blocked by automatic calibration).
-
The turbulence window processes " on average quadratic "
on a square of 16x16 in the center. An old algorithm adapts the 100% regularly
(last max. receipt or 98% of the so lower max. last).
-
Guidance is right on the level of the paste-up and I put
a message stopper to prevent its use.
-
The optimization of the memory remains to be done: if you
have problems, avoid composite imaging. The management of the program to
the top of 64k is my (ASTROQC.DLL): Ca goes on X86 but it is " propriatory".
I do not have a problem in W95, W98... maybe on another processor????
-
The installation procedure is simply a copy in a directory...
one did better. One hopes to do better .
Functions for astronomy
-
The image capture
The first use of the program is to capture images and
to record them on magnetic medium.
The program makes it possible to record a pretreated image.
The recording is made in the folder of its choice (see
" options ").
The name of the file consists of a name from 1 to 5 characters
supplemented by a number automatically incremented by the program.
The images are recorded with standard format BMP.
-
The pretreatment on
line
The user can ask that all the images be the object of
one or more raitements taken among the following:
-
Subtraction of a black image : to compensate for the effect
known as of " dark current ", a " black " image can be subtracted byte
by byte from the collected image. This black image can come either from
a file by default *, or of one or more images taken in sequence and added
(or which one takes the median *).
-
-
-
-
-
-
-
-
-
-

-
-
-
-
-
-
-
-
-
-
-
-
-
-
-
-

-
-
-
-
-
-
-
-
-
-
-
-
-
-
-
-
-
-
-
-
-
-
-
-
-
-
-
-
-
-
-


